Introduction

6104R
- Grand Complications
Self-winding

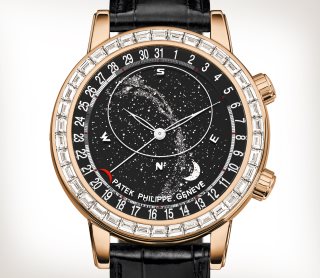
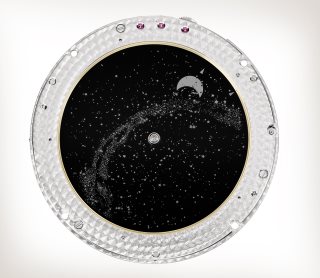
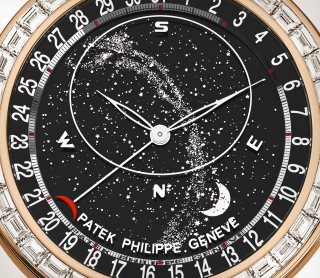
Highlighting Patek Philippe’s great tradition of astronomical watches, the Celestial devotes its dial to a rotating chart of the heavenly bodies. At any time, its owner may admire the exact configuration of the nocturnal sky in the northern hemisphere, with the apparent movement of the stars and the phases and orbit of the moon. Two skeletonized hands point to the hours and minutes of mean solar time. An Ellipse, deposited on the underside of the sapphire glass, frames the portion of the sky visible from Geneva and all other cities located at the same latitude.

Watch
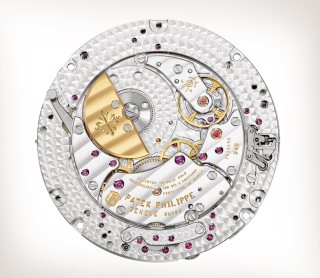
Self-winding mechanical movement. Caliber 240 LU CL C. Date by hand. Hours and minutes of mean solar time. Sky chart, phases and orbit of the Moon. Time of meridian passage of Sirius and of the moon. Black sapphire-crystal disks for sky background and moon phases. Transparent sapphire-crystal disk for sky chart and Milky Way.
Dial
Transparent sapphire-crystal disk for sky chart and Milky Way.
Case
Case: rose gold. Case diameter: 44 mm. Height: 11.33 mm. Water-resistant to 30 m. Sapphire crystal case back.
Gemsetting
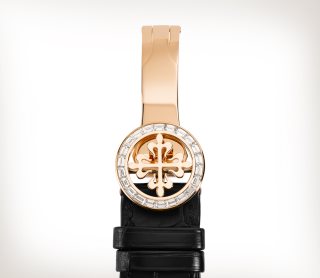
38 baguette-cut diamonds : ~4.27 ct. (bezel). 22 baguette-cut diamonds : ~1.13 ct. (clasp). Total of 60 baguette-cut diamonds (~5.4 ct.).
Strap
Alligator strap with rectangular scales, hand-stitched, shiny black. Fold-over clasp.
Price :

This watch has been added to your wishlist

Caliber

240 LU CL C
Self-winding

Patek Philippe Caliber 240 LU CL C - Front
Front Back

240 LU CL C
Self-winding

Celestial with date. Diameter: 38 mm. Thickness: 6.81 mm. Number of parts: 315. Bridges: 12. Jewels: 45. Power reserve: min. 38 hours, max. 48 hours. 22K gold off-center mini-rotor. Balance: Gyromax®. Vibrations/hour: 21 600 (3 Hz). Balance spring: Spiromax®. Hallmark: Patek Philippe Seal. Patent: CH 595 653.

Adjustment procedure for Sky Moon Tourbillon

Adjustment procedure for Sky Moon Tourbillon

Adjustment procedure for the Celestial

Adjustment procedure for the Star Caliber 2000

  • On sky side
    • Moonphase revolution: Loading...
    • Moon adjustments
      • Large divisions: Loading...
      • Small divisions: Loading...
    • Sky adjustments
      • Large divisions: Loading...
      • Small divisions: Loading...
  • On dial Side
    • Leap year cycle: Loading...
    • Day of the week: Loading...
    • Date: Loading...
    • Month: Loading...
    • Moon age: Loading... (Loading... pushes)


Sky Moon Tourbillon Ref. 5002 - Adjustments procedure

Please wind your watch by hand before correcting any of the displays. To prevent damage to your watch, perform all settings and corrections involving the corrector buttons with the setting stylus that was delivered with your Sky Moon Tourbillon. All settings and corrections must be performed in the specified order.

1. Adjustments of the perpetual calendar and the moon age (dial side)

1.1. Preparatory steps:

Gently pull the winding crown at 4 o’clock out and rotate the hands clockwise until the flyback hand of the date display advances by one day. Then set the hands to 6 a.m. Now, activate the corrector button between 11 and 12 o’clock and repeat until the flyback hand points to 1.

1.2. Setting the leap year cycle (subsidiary dial at 12 o’clock) and the month (subsidiary dial at 3 o’clock):

In the program, the line marked “Leap year cycle” gives you the Roman numeral that indicates the year cycle. Leap years are identified with the Roman numeral IV. Activate the corrector button between 3 and 4 o’clock to first set the leap year display and then the month display.

1.3. Setting the date (flyback hand):

The date is set with the corrector button between 11 and 12 o’clock. You will note that the date hand and the day of the week display advance simultaneously. The day of the week can be corrected in the next step.

1.4. Setting the day of the week (subsidiary dial at 9 o’clock):

Activate the corrector button between 6 and 7 o’clock to set the day of the week.

1.5. Setting the moon age (subsidiary dial at 6 o’clock):

Use the corrector button between 5 and 6 o’clock to advance the hand until it points to the full moon. In the program, the line marked “Moon age” tells you how many times you have to activate the corrector button to obtain the correct moon age display.

2. Adjustments of the sky/moon mechanism (sky side)

This mechanism is corrected with the second crown at 4 o’clock on the 24-hour dial with the sky chart facing up and the crown on the right-hand side. Turning the crown clockwise corrects the sky chart and sidereal time. Turning it counterclockwise corrects the moon.

2.1. Setting the moon and the moon phase:

When the moon phase display indicates a full moon, align the moon index with the meridian (S). In the program, the line marked “Moon phase” tells you how many revolutions the moon must perform to obtain the correct moon phase display setting. Advance the moon index by that number of revolutions. In the program, the lines marked “Moon” tells you the number of large and small graduations by which you must advance the moon index. This completes the moon setting procedure.

2.2. Setting the sky:

Align the sky index with the meridian (S). In the program, the lines marked “Sky” tells you the number of large and small graduations by which you must advance the sky index. This completes the sky setting procedure.


Sky Moon Tourbillon Ref. 6002 - Adjustments procedure

Please wind your watch by hand before correcting any of the displays. To prevent damage to your watch, perform all settings and corrections involving the corrector buttons with the setting stylus that was delivered with your Sky Moon Tourbillon. All settings and corrections must be performed in the specified order.

1. Adjustments of the perpetual calendar and the moon phase (dial side)

1.1. Preparatory steps:

Gently pull the winding crown at 4 o’clock out and rotate the hands clockwise until the flyback hand of the date display advances by one day. Then set the hands to 6 a.m. Now, activate the corrector button between 11 and 12 o’clock and repeat until the flyback hand points to 1.

1.2. Setting the leap year cycle (subsidiary dial at 12 o’clock) and the month (subsidiary dial at 3 o’clock):

In the program, the line marked “Leap year cycle” gives you the Roman numeral that indicates the year cycle. Leap years are identified with the Roman numeral IV. Activate the corrector button between 3 and 4 o’clock to first set the leap year display and then the month display.

1.3. Setting the date (flyback hand):

The date is set with the corrector button between 11 and 12 o’clock. You will note that the date hand and the day of the week display advance simultaneously. The day of the week can be corrected in the next step.

1.4. Setting the day of the week (subsidiary dial at 9 o’clock):

Activate the corrector button between 6 and 7 o’clock to set the day of the week.

1.5. Setting the moon phase (subsidiary dial at 6 o’clock):

Press the corrector button between 5 and 6 o’clock to advance the lunar disk until it shows a full moon. On the left side of your screen, consult the lunar calendar to determine the number of days that have elapsed since the last full moon. Then perform the correction (1 actuation of the button for every elapsed day, but not counting the day of the last full moon).

2. Adjustments of the sky/moon mechanism (sky side)

This mechanism is corrected with the second crown at 4 o’clock on the 24-hour dial with the sky chart facing up and the crown on the right-hand side. Turning the crown clockwise corrects the sky chart and sidereal time. Turning it counterclockwise corrects the moon.

2.1. Setting the moon and the moon phase:

When the moon phase display indicates a full moon, align the moon index with the meridian (S). In the program, the line marked “Moon phase” tells you how many revolutions the moon must perform to obtain the correct moon phase display setting. Advance the moon index by that number of revolutions. In the program, the lines marked “Moon” tells you the number of large and small graduations by which you must advance the moon index. This completes the moon setting procedure.

2.2. Setting the sky:

Align the sky index with the meridian (S). In the program, the lines marked “Sky” tells you the number of large and small graduations by which you must advance the sky index. This completes the sky setting procedure.

Star Caliber 2000 - Instructions for setting the perpetual calendar and the sky/moon mechanism

1. Situation 1: Your watch stopped less than four days ago.

a. First, wind the watch.
b. Then set the perpetual calendar and the correct time with the winding crown.
c. Setting the sky/moon mechanism:
Below gives the information you need to position the sky and moon indices as well as the number of moon revolutions required to set the moon-phase display. These settings are performed with the rotating bezel.

1.1. Moon and moon-phase settings

- Set the moon phase to full moon and then align the moon index with the meridian (M).
- In the program window, "Moon phase revolutions" indicates the number of dial revolutions the moon has yet to compete to indicate the correct moon phase.
- Using the rotating bezel, advance the moon index by that number of revolutions.
- In the program window, "Moon adjustments" indicates the number of large and small graduations (divisions).
- Advance the moon index by that number of graduations (divisions). This completes the moon function setting procedure.

1.2. Sky settings

- Align the sky index with the meridian (M).
- In the program window, "Sky adjustments" indicates the number of large and small graduations.
- Advance the sky index by that number of graduations (divisions). This completes the sky function setting procedure.

2. Situation 2: Your watch stopped more than four days ago.

a. First, wind the watch. b. Then set the perpetual calendar. - Each time the rapid correction slide is operated, the calendar displays are advanced by nearly one full month without changing the relative settings of the perpetual calendar, the running equation of time, and the sunrise, sunset, and season indications.
- Release the slide one or two days before the desired date is displayed. The slide is automatically returned to its home position by a spring.
- Complete the date setting by activating the corrector at 12 o’clock with the setting stylus as many times as needed until the correct date is indicated.
- When the correct date is displayed, activate the corrector at 4 o’clock until the correct day of the week is displayed.

2.1. Moon and moon-phase settings

- Set the moon phase to full moon and then align the moon index with the meridian (M).
- In the program window, "Moon phase revolutions" indicates the number of dial revolutions the moon has yet to compete to indicate the correct moon phase.
- Using the rotating bezel, advance the moon index by that number of revolutions.
- In the program window, "Moon adjustments" indicates the number of large and small graduations.
- Advance the moon index by that number of graduations. This completes the moon function setting procedure.

2.2. Sky settings

- Align the sky index with the meridian (M).
- In the program window, "Sky adjustments" indicates the number of large and small graduations.
- Advance the sky index by that number of graduations. This complete the sky function setting procedure.

Celestial Ref. 5102, 6102, 6103 & 6104 - Adjustment procedure

Please, wind your watch by hand before correcting any of the displays. All settings and corrections must be performed in the specified order.

1. Setting the Moon and the Sky

1.1. Moon phase

The moon is set by pulling the crown situated at 4 o’clock and by turning it clockwise. By turning the crown, position the full Moon facing the letter "S" (an arrow-shaped index under the moon will help you position it accurately). This may require up to 28 revolutions! In the program, the first line entitled “Moon phase Revolution” will indicate how many revolutions of the dial the Moon has yet to complete before its phase will match the current date. (For example, if it is number “5”, you will need to make the Moon index go by the letter “S” 5 times).

In order to set the Moon phase according to the exact time, you will need to wind the same crown, in the same direction, until the Moon index covers x large and y small graduations on the bezel scale. (Indicated in the program by “Moon - large” and “Moon - small”).

1.2. Setting the sky

The Sky is set by pulling the crown at 4 o’clock and winding it counter-clockwise. Position the Sky index (small arrow on the Milky Way) facing the “S”. Wind the crown until the index has covered the large and small number of graduations indicated by the program (Sky - large; Sky - small). The graduations are found on the bezel of the watch. When the setting is complete, do not forget to push back the crown to its initial position.

2. Setting the time

The time is set by pulling the crown situated at 2 o’clock and by turning it in any direction. The crown must be pushed in again when setting is completed.


Settings

How to set the moonphase indicator?

fullmoon calendar
fullmoon calendar
fullmoon calendar
fullmoon calendar
fullmoon calendar
fullmoon calendar
fullmoon calendar
A disc, decorated with golden stars and two golden moons against a blue or white background representing the sky, rotates within an aperture. The disc is cut from a wafer of corundum crystal (sapphire).

Gold was condensed onto the disc by means of a vacuum process through a photographic mask to create the shape of the moons and stars.  The aperture is cut at its upper edge in order to represent the lunar cycle.

During the first days of each lunation, the leading edge of a golden moon becomes visible as a crescent on the left of the aperture and appears to wax as it emerges beyond the curved edge of the aperture representing the lunar terminator.

Half way through the lunation, the moon appears full. It then wanes as it disappears behind the terminator on the right of the aperture.

As the moon vanishes, the second moon on the disc is ready to appear on the left.

Savoir faire

Attention to details
Gemsetting

Any gem chosen for use in a Patek Philippe case or bracelet – diamond, ruby, sapphire, emerald – will be the very finest of its kind, and comply with the Patek Philippe Seal’s strict criteria. At Patek Philippe, only the top D to G color range is used. The clarity of the diamonds is always of the desirable internally flawless grade (known as IF), and exhibits an immaculate cut. The precision of the cut is also vital in ensuring a regular and even setting. The task of the gemsetter is to place it perfectly, so that it shows to exquisite advantage and is of course secure. Patek Philippe gems are set in the time-honored way – by hand, never bonded with adhesive. The setter positions each precious stone in its mount, either in a bezel-setting where the gem is set by carefully folding in the metal collar (usually gold) that surrounds it, or in an invisible setting, where the gem has a groove on the underside that fits onto a hidden grid of rails. Gems must be placed level, pointing in the same direction and all at the same height, while ensuring an ultra-safe hold. Precision and regard for the shape and character of the gem is vital to bring out its beauty and achieve the brightest radiance and luster.

We use cookies to deliver website functionality and analytics as described in our cookie policy and to ensure that we give you the best experience on our website. By continuing to use our website without changing the settings, you are agreeing to our use of cookies.